Sunday, December 26, 2010

Merry Christmas!

I hope you all had a wonderful Christmas! The days leading up to Christmas were a bit hectic for us, but the day was lovely and the kids (and I!) got spoilt! I love Christmas, and Boxing Day is always a bit of a downer because I'm a bit sad its all over. But in saying that we had a nice day today playing with toys, building things, opening a multitude of boxes etc. The kids loved it!

Anyway, just thought I'd show a couple of things today. The first is a small "cutesy" gift I gave to a few friends kids. They were simple to make and I've used the Reindeer again that we used on Jacobs cards.


Some are filled with Jelly Beans, the others with M&Ms. The kids liked them!

I also wanted to show you a card. This is the card I made for my husbands birthday last week. It is using one of the new sets, Love Defined, from the latest mini catalogue and I just love it. This card was based on one in the catalogue, with a few slight alterations.

I am loving this colour combination at the moment - Rich Razzleberry, Old Olive, Tempting Turquoise and whisper White.

I am planning on getting some Scrapbooking done this week, so hopefully I will be back in a few days with some layouts to show you.

I hope you enjoy the rest of the break. I am hitting the shops tomorrow for the sales...hopefully I survive!

Tuesday, December 21, 2010

Kids Christmas Cards

So this year my kids wanted to make their Christmas Cards for their friends. At first I was really excited about the idea, however hours into it and I was not quite so excited!!! The kids enjoyed it, but 3 kids giving cards to everyone in their class adds up to around 70 cards! Each of my kids wanted to do a different design and they were not keen on me making too many suggestions!!! So I had to go with the flow and offer advice where I could and keep my mouth shut about crooked pieces stuck to cards!

So the first card was by my 8 year old son, Jacob. He actually saw me looking at this reindeer on a website and he wanted to make it for the front of his cards. It is very cute and he was so proud of his cards. It is easy to make, although when you are doing 25 of them, it is quite fiddly!


It is made using the Owl punch and the leaves from the Bird Punch. I really liked how it turned out and apart from me helping with the eyelids (those pieces were so tiny!) and cutting the square, Jacob did it himself.

Next up was my 8 year old daughter, Ella. She and her friends love crafting so she was keen to impress them! Ella is a complete animal lover so of course she was going to pick to do a rudolf. However, she wanted a cutesy Rudolf rather than the Rudolf Jacob did above. So this is what we came up with.

This deer is from the Forest Friends Stamp Set and we just added a red brad for the nose. Of course, what 8 year old girl wouldn't want a bit of bling, so their is the Rhinestone Jewel next to the Merry Christmas. Ella was also very proud of her cards and her friends liked them too!

Now to the trickiest one, my 5 year old son Noah. He is very stubborn and really didn't want to listen to my suggestions. He was adament he was using the Make a Monster Stamp Set! So after a lot of coaxing, I talked him into this...

And funnily enough, I actually liked this card when it was done. Combining the monster with the tree actually worked quite well! I helped a bit more with Noah's, although he still did a lot himself.

So even though it was a long process, we got there in the end and the kids were all happy with what they made. I love that they knew what they wanted to do and stuck with it. It makes the cards a lot more personal.

Thanks, as always, for stopping by. I hope you are surviving all the last minute Christmas preparations...only a few days to go and it will all be over for another year. Even though it is busy, I really do love Christmas time!

Sunday, December 19, 2010

Christmas Gifts

The last week I have busily been making a few Christmas Gifts for teachers at school and a few other people that I give something small to.

For the teachers at school, it is just a small gift as each class also collects money to buy one combined present (much better for the teachers I'm sure as they are not ending up with multitudes of chocolates & candles!!!). My kids like to give their own presents to their teachers as well so I made these cute little milk cartons with the caddy. Each caddy holds 4 mini milk cartons. The mini milk cartons are made from a Big Shot Die and the caddy is just a template I have. These are so, so cute and definitely give the wow factor. They are fairly simple as well...a little time consuming, but not difficult.


The cute flower that is on the caddy is my new favourite thing to make right now. It is very easy and looks very effective. You just need the scallop circle punch. In the new year I might post some instructions on how to make it.

The teachers were very grateful for the present. In case you are wondering, the mini milk cartons are filled with M&Ms, Favourites Chocolates, jelly type chocolates and jelly beans.

The other gift I made was for the ladies in the school office. I have a lot to do with them as I am part of the P&C and they are always so helpful so I wanted to give them something small to say thanks. I made some Rocky Road and packaged it up.


Again I have used the cool flower...told you I like it! These little boxes were so easy to make and they look really effective. The recipients loved them!

Thanks for stopping by. Don't forget to leave me a comment so I know you've been here!

I will be back in a couple of days to show you the Christmas cards each of my kids made for their friends.


Saturday, December 18, 2010

One Week to Go...

Amazing that it is only one week until Christmas. Things are just so hectic this time of year. I really have neglected my blog a little...Sorry!

So I have a couple of Christmas items to share with you. Firstly another card...one of my favourites that I have done for Christmas this year.

I've used Real Red and the In Colour, Pear Pizzazz and I just love this combination together. I've also used a strip of the Designer Series Patterned paper stack and the very versatile Taffeta ribbon. The Stamp Sets are Delightful Decorations and Heard from the Heart. This is an easy, but effective card to make. The little Rhinestone jewel in the centre of the bauble finishes it off I think.

Next up some Christmas Gift Tags. These are very, very simple to make, taking no more than 5 minutes each to complete which, at this time of year, is vital!


This uses the same colour combination as the card above and also uses the Contempo Christmas Stamp Set (my favourite Christmas stamp set this year!).

Well that's all I have to share with you today. I will be back in a few days with some more Christmas items and an adorable birthday card I made for my hubby (it is his birthday today...Happy Birthday Babe!) using the Love Defined Stamp Set from the new Mini Catalogue.

Have a good weekend.

Saturday, December 4, 2010

In the Christmas Mood

Today I've definitely been in the Christmas mood! This morning I spent some time with my kids making Christmas cards for their friends...I will share them in a few days once they are finished. I also went with some friends and put together a Gingerbread House and decorated it with lots and lots of lollies! It was really fun and overall I'm happy with how my house turned out. The kids loved it when I got home and were desperate to break it open now and eat it...I managed to deter them, but not sure it will last till Christmas Day! We've also been watching a Christmas movie - Santa Paws! The kids really enjoyed it and I have to admit I didn't mind it either!!!!!

Anyway, I have another card to share with you...again a Christmas one. This is using the absolutely beautiful wide striped grosgrain ribbon. It is absolutely divine.


I've also used the Season of Joy Stamp set and the adorable Pearls. The colours are a little non-traditional, but I like them! I've used Crumb Cake (formerly Kraft), Night of Navy and Cherry Cobbler.

I still haven't come up with what I am doing for my own cards as yet, I am still putting it off. It is my plan for tomorrow though, so fingers crossed I can come up with something!

Hope you are having a good weekend.


Wednesday, December 1, 2010

I'm Back as Promised

As I mentioned this morning, I am back to share a couple of Christmas items with you. I taught a Christmas Card class a few days ago and we made some lovely cards. One of which is this one...

This card uses the very versatile Season of Joy Stamp Set. The carstock is Pear Pizzazz and Real Red along with Whisper white. Its the same colours in the ink. The addition of the little Rhinestones at centre of the flower really finish it off. I can't take all the credit for this card...I did see something similar somewhere on the net, I just can't remember where!

The ladies that attended my class have been regular customers this year so I made each of them a little gift using the very cute Milk Carton Die for the Big Shot.


Here I have used a baulbe from the Delightful Decorations Stamp Set and again the Real Red cardstock and ink along with the Rhinestone. The Patterend Paper is from the DSP In Colour Paper Stack and it is again in the Pear Pizzazz colour. I've put a few chocolates inside these and finished tehm off with a bow. The ladies loved them!

I have a few more cards to show you over the next few days, so stay tuned!

I have to admit I'm feeling the pressure for coming up with a design for my own Christmas Cards this year. I've always done a photo card in the past, however now that I am a SU Demonstrator I would like to incorporate stamping into my cards as well. Plus I'm also thinking that the kids at 8 and 5 have kind of lost the cutesy look for the front of a Christmas card. Perhaps I should just stick a photo inside for those that don't see them very often? I can come up with lots of designs if they are not for my cards but as soon as I sit down to start my cards, I'm not happy with anything!!! I've got to get my act together as several of my cards get sent overseas, so I am cutting it a little fine! Hopefully this weekend I will get organised.

Thanks for stopping by. Don't forget to check out the new mini catalogue through the link on my sidebar and also the December Frenzy Specials on the previous post.

Stay dry!

Two Big things start today...

The 1st of December...who can believe it!!!!

Today is the start of the new Stampin' Up! Summer Mini Catalogue and believe me it is adorable. There are some wonderful new stamp sets and products. To view the catalogue online click here. If you would like to order anything just send me an email.

The second big thing is the Stampin' Up! December Frenzy. There are a bunch of Stamp Sets and products on sale for up to 50% off. This is a huge saving so take advantage of it NOW! It is while stocks last only. To view the December Frenzy items click here. Some of the products on sale include the Wonderful Favourites Wood Mount Stamp Set, Teeny Tiny Sentiments Stamp Set, Heard from the Heart Stamp Set, Baby Bundle Stamp Set, a variety of Stampin' Write Markers, the Hodgepodge Hardware and many others. Take advantage of the sale now and buy yourself an early Christmas Present!!! To order please email me asap to get the items before they sell out.

If you have any questions at all, please let me know.

I will be back later today with some Christmas Cards I have been making.

Have a good day.

Friday, November 19, 2010

Christmas is Not Far Away

Believe it or not this realisation has just hit me in the last week. There are only 4 weeks of school left and I need to get my act together before the kids finish up because I really don't want to take 3 kids Christmas shopping the week before Christmas! Of course, with Christmas comes the busyness of this time of year. I have had so much on and hardly had time to think, let alone have time to be creative!!!! So I've been a bit slack on my blog posts.

I do have a Christmas card to share with you though. This is a very basic one, but effective all the same. A bit of bling is perfect for Christmas cards and gives them an extra special feel!

This card uses the wonderful Contempo Christmas Stamp Set and the beautiful taffeta ribbon, plus of course the bling (Rhinestone Jewel) at the top of the tree.

Tomorrow I am attending my first Stampin' Up! Regional Meeting. I am really excited to go and meet other SU Demonstrators and learn more about techniques and products. I'm sure I will have lots to share with you next week! So stay tuned for lots more inspiration.

Thanks as always for stopping by. I love reading your comments...it helps to know that people do actually stop by and read my blog!!!

Have a good weekend.

Monday, November 8, 2010

A free class

I just stopping by really quickly to let you know that I have signed up for this free class from Jessica Sprague. Jessica is very talented in all areas of photoshop, digital scrapbooking, hybrid scrapbooking and much more. She offers online classes that I have participated in before and they are great. For those of you that are interested in learning more about Photoshop this is the place to go.


Anyway, this class is free so why not give it a go. I am!

Be back in the next day or two...I'm starting to get into Christmas mode, so have a few things to show you.

Saturday, November 6, 2010

11 years ago...

My hubby and I got married 11 years ago today...amazing how time flies! He has spoilt me today and tonight we are going out to dinner. I'm very lucky to have him!

Anyway, I am just stopping by quickly to show you a card I made. I am still unsure about it. I think I like it, but then I am not sure if it is a bit too simple. Anyway, would love to know your thoughts!

This card uses the wonderful Flight of the Butterfly stamp set along with the matching punch. As well as a cute little button from the new SU button sets, a scallop circle punch and the lovely new Designer Patterned Paper Stack - In Colour Blushing Bride. I love the paper stack, it is so versatile!

Well off to get ready for dinner...let me know what you think about the card. I always love comments, it helps me to know that people are actually reading my blog!!!

Have a good weekend.

Sunday, October 31, 2010

Just Add Ink 41

Once again I am participating in the Just Add Ink Challenge. Its great to have something to work towards rather than just making a random card. So the theme for this week is JUST ADD BIRTHDAYS...to make a birthday themed card (JAI #41). Now this is a very broad topic, so here is my card...


I've used Old Olive and Whisper White Cardstock teemed with the Olive Old and Tempting Turquoise ink pads. The cute button is from the SU Bold Brights button pack (which I adore!) and the ribbon is non SU. I've also used the gorgeous new little SU pearls which add a touch of elegance to the card I think. The stamp Set I've used is Cute by the Inch which is a current hostess set.

Also, I just wanted to point out that anyone can join in on the Just Add Ink Challenges...it is not just for SU Demonstrators, so why not give it a go!

Now completely off the topic, I'd like to wish my very good friend Samantha a very Happy Birthday. She is a wonderful, wonderful friend and I hope she has had an amazing birthday weekend.

Thanks for stopping by...remember I love knowing that you have been here, so leave me a comment so I know you have stopped by. You don't need to have a google account, you can just sign in as Annoymous.


Friday, October 29, 2010

Punch Art Blog Hop

Welcome to my first ever Blog Hop...the inaugural South Pacific punch art blog hop!!! If you are coming from Tia's blog, I hope you are enjoying the blog hop so far and getting lots of inspiration. If you are just starting out at my blog then WELCOME and grab a cuppa so you can sit back and be inspired by all the wonderful creations on the different blogs.


A bunch of us Stampin Up demonstrators from NZ and Australia have got together to put this blog hop together. We all love our Stampin Up punches. We have gotten together to showcase a selection of the punches you can purchasae from Stampin Up. Please leave a comment and let us know what you think to go in the draw to win some yummy scrummy punch art blog candy (offer not available to su demos). Comments are open till Friday 5th Nov at 10am.

So the way it works is that each of us demonstrators have been assigned a punch/s to showcase. You start at one blog (doesn't matter which one) and then you follow through the links. So at the end of my post will be the link to the next blog in the blog hop and so on. I've also included the full list of blogs just in case you have any trouble! 

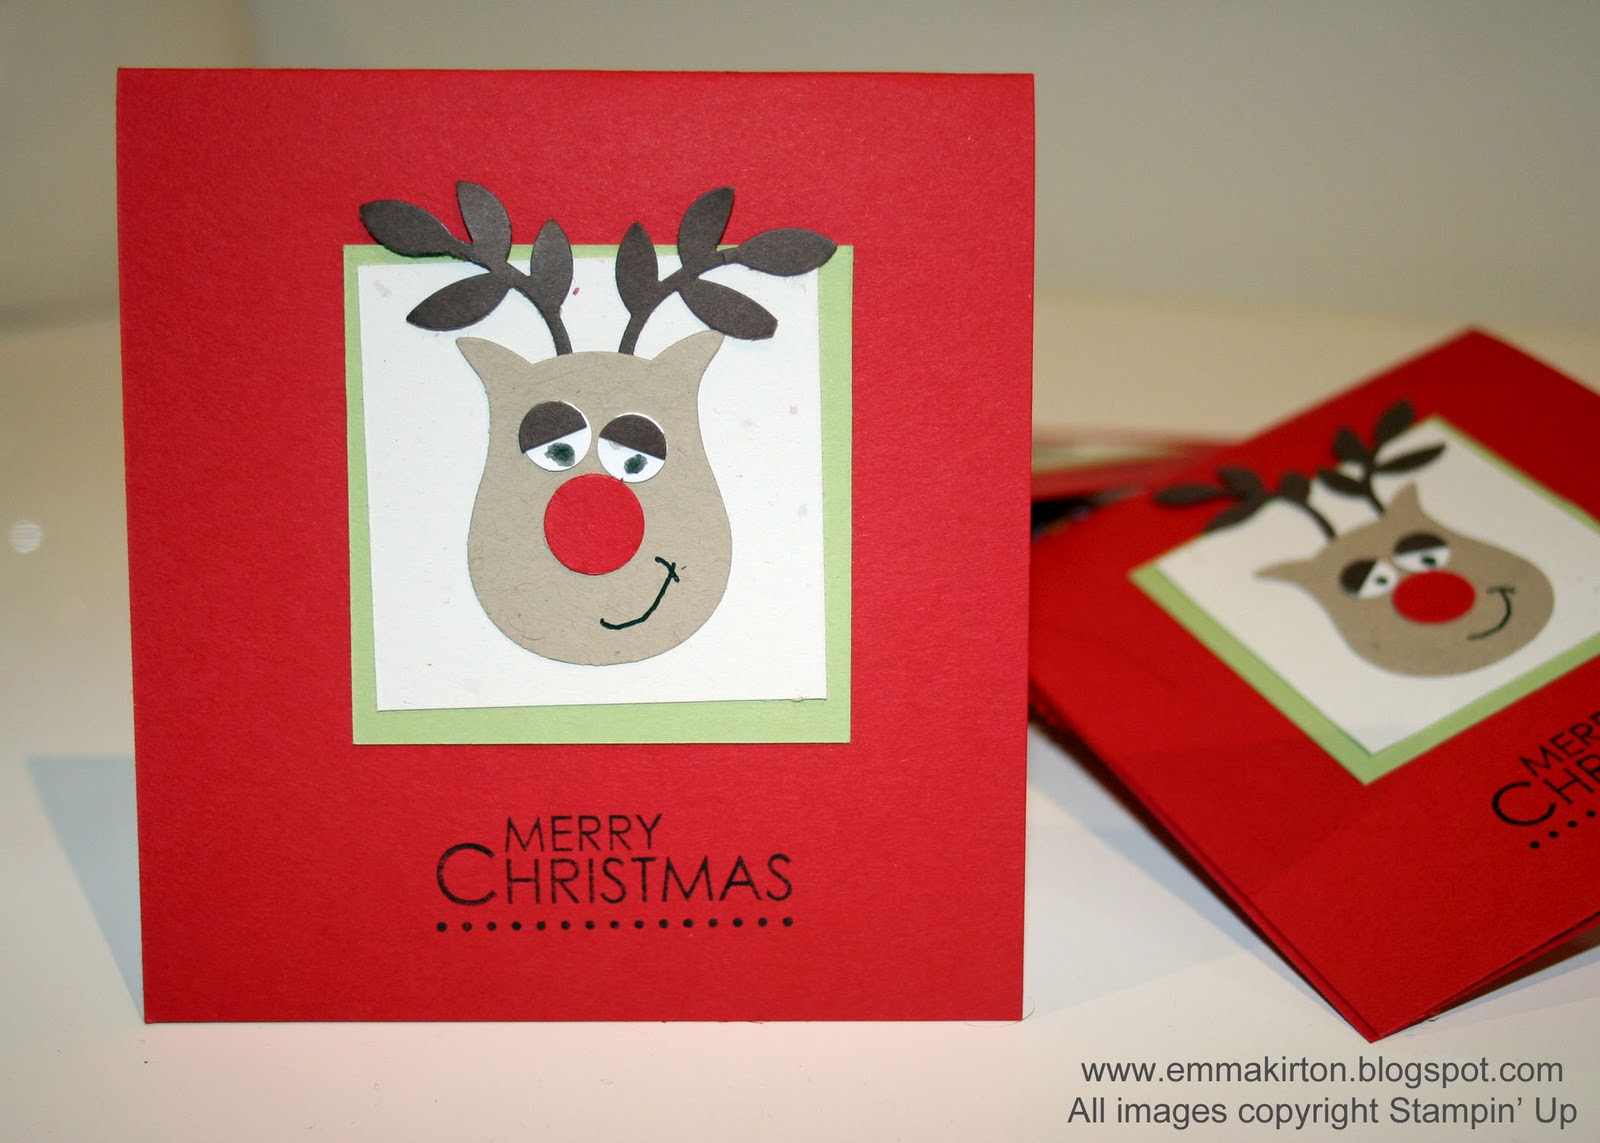
So I am doing the 6 x Circle punches and I would have to say without a doubt these are my most used and most versatile punches. They have so many uses. I use them alot on Scrapbooking Layouts, but also on cards.

Before I go any further, I have to apologise for my photos...I did leave things till the last minute and took all these photos last night so the lighting is a bit dodgy and they are quite crooked as I was trying to get it all finished. Anyway, moving on...
I have heaps of picutres to show you...it really is the best way to showcase how versatile these punches are.

Firstly, Circles are wonderful for use as general embellishments on scrapbook pages...


Some of you may have seen this one before, but I thought I'd use it again as it is a good example of using patterned paper with the circle punches.


Whether you use one, three, six or more circles, you really can't go wrong. They really add some interest to scrapbook layouts.


Then you can add layers to your circles. Whether you use a few different size punches or combine a circle with another punched shape such as the scallop circle or a square, it will always give a great effect.


Another great use for one of the larger circle punches is to punch out a photo. This can really draw attention to an expression on the face of someone if you crop in close and punch out your circle...


This one below may be a little hard to see, but if you take several punched circle shapes (in this case white circles) and put them together they give a flower like effect. You could also place half circles on a page to give a large scallop like effect.

I love using half circles as well. All I do to create this effect is punch out the circle then cut it in half using my trimmer. This layout was done a few years ago and I loved it so much that I recently created a card using the same effect and similar colours! 

Circles come in handy for a place to add a date to a scrapbook layout as well...


My last example of the circle punch is to not only punch out a circle but to punch out a half circle to use as a frame of sorts. Its hard to explain, but you can see what I mean in the two layouts below.


I highly recommend all sizes of the circle punch (there are 6 available through Stampin' Up!). However, I have to say my most used sizes are the 1 3/4"; the 1 1/4" and the 1" punches. They can be found on pages 146-147 of the IB&C and they range in price from $11.50 through to $33.95.

So now you can move onto the next blog in the blog hop which is the very talented Angie Jones and she is showcasing the Ornament punch. Check out her blog at http://angiescraftfusion.blogspot.com/

Don't forget to leave me a comment and you will go in the draw to win some blog candy prizes from all of us demonstrators! Below is the list of all the demonstrators that are participating in the blog hop.

Thanks for stopping by.


1. Karen Southwell - http://www.kareniescrafts.blogspot.com/
2. Carol-Ann Torrie http://queen-of-scraps.blogspot.com/
3 Sally Williams http://www.sallycancraft.com/
4 Julia Leece - http://www.juliascards.blogspot.com/
5 Amy http://ladybugsanddaisychains.blogspot.com/
6 Melissa Davies http://beedevinedesigns.blogspot.com/
7 Michelle Dyson http://www.stampinkpaper.blogspot.com/
8 Clare Mcilhatton http://craftycowcreations.blogspot.com/
9 Lisa Bullock http://daffyscrapper.wordpress.com/
10 Pauline Bennetts - http://paulinebennetts.com/stampede/
11 Tia Routledge http://craftingwithtia.weebly.com/my-blog.html
12 Emma Kirton http://www.emmakirton.blogspot.com/
13 Angie Jones http://angiescraftfusion.blogspot.com/
14 Andrea Buckland http://creatingcardswithandrea.blogspot.com/
15 Steph Gray http://stampinsteph.wordpress.com/